


 During placement, temporary shells can be used as surgical guides to confirm the appropriate implant positioning prior to the implant going to the final depth of the osteotomy. If the angulation is not ideal, some modification can be made, While still being able to maintain a high insertion torque.
The implant must be planned and executed with a high precision as regards the position, angulation and depth in order to utilize the lab made custom temporary shells successfully.
The preferred depth of implant placement should be at least 3-4mm apical to the proposed facial gingival zenith (Linkevicius). An appropriate implant placement depth is crucial to provide adequate running room for the temporary and final restorations, a concave emergence with an adequate jump gap with the appropriate “regenerative space” (Gonzalez-martin) during dual zone grafting (Tarnow). In thin tissue phenotypes or in cases with pre-existing recession, soft tissue augmentation utilizing a connective tissue graft can be done at this time. Due to a favorable phenotype and the absence of any soft tissue defect, this case didn’t need a soft tissue graft.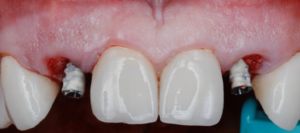
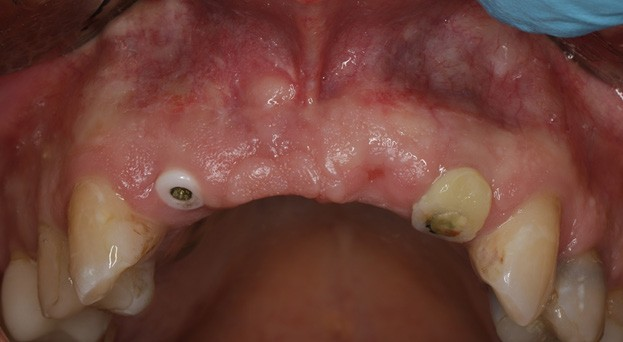
Upon insertion of the temporary abutments, a radiograph should be taken to confirm adequate seating, if the seating of the abutments is not passive, confirm that the surface of the abutment is not impinging on the socket walls. Profiling the bone may be needed in some cases to prevent the formation of a bony defect due to the proximity of the restorative abutment to the bony walls of the socket.
Prior to the pick up, liquid Opaquer (kerr) can be used to mask the metal hue of the temporary abutments if not using PEEK abutments.
Once both temporary abutments were passively seated, the temporary shells were adjusted to be seated over the abutments freely. Sometimes some adjustment can be needed to increase the diameter of the abutment hole.
The custom shells were picked up using a self-cure composite based temporary material (Integrity), the wings can be removed at this stage and the “sub- critical zone” of the emergence profile was customized chairside by hand using a flowable composite and football diamond bur
The screw retained temporary restorations were hand tightened to about 15N and sealed with Teflon tape and Fermit™ Temporary Filling Material.
There should be no centric or protrusive occlusal contact. If the adjacent teeth are periodontally compromised, I also prefer to have very light proximal contacts to avoid any micro movement from the adjacent teeth during normal mastication
The 6 weeks follow up showed stable soft tissue, no signs of inflammation, and good maintenance by the patient. The implants showed no mobility and appeared to be integrating uneventfully.
Prior to the pick up, liquid Opaquer (kerr) can be used to mask the metal hue of the temporary abutments if not using PEEK abutments.
Once both temporary abutments were passively seated, the temporary shells were adjusted to be seated over the abutments freely. Sometimes some adjustments can be needed to increase the diameter of the abutment hole.


Upon prosthetic evaluation, since bothteeth were deemed unrestorable, the replacement plan an implant supported restoration. Radiographically, tooth #7 exhibited a moderate-sized periapical radiolucency.During the initial examination appointment, a CBCT and I-tero scans were obtained along with the appropriate shade to start planning an immediate non-functional tem-porary restoration. An intraoral scan was sent to the lab for digital planning of the temporary restorations.
A CBCT review showed adequate bone palatal to the socket wall, so the bone density appeared to be favorable for immediate implant placement.
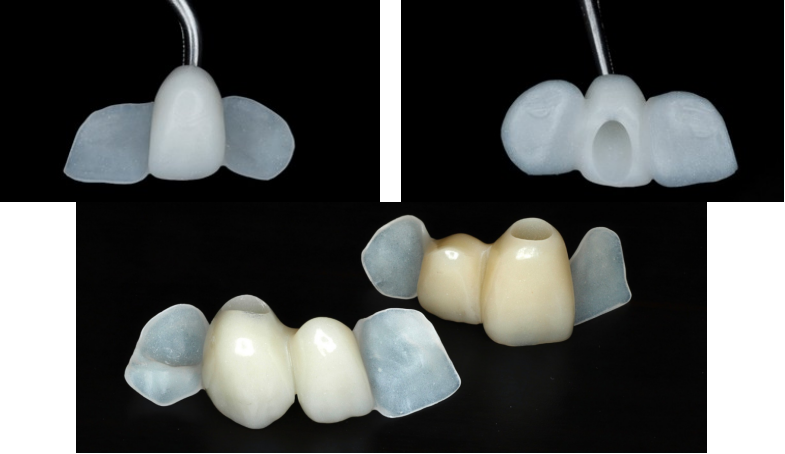
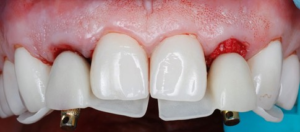
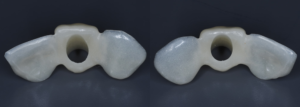
A milled PMMA temporary shell was designed with an ideal screw access and built-in critical zone for the emergence profile. The screw access area was designed to fit an the average diameter of a temporary abutment. This design decreases excessive adjustment of the shell.
The design of the temporary shell also included indexing wings which function to align the planned temporary restoration to the proper 3D orientation with perfect proximal contacts and no- centric occlusion restorations.
Su et al. described two zones for implant provisional restoration: critical zone (most coronal aspect of the temporary). contour controls the gingival zenith placement whereas the subcritical contour maintains and supports the peri-implant soft tissue volume.
The lab was specifically instructed to make the critical contour of the temporary shell about 0.5-1mm shorter than the ideal gingival zenith to allow for a slight coronal migration of tissue during the healing period. The final gingival zenith can be idealized during further tissue training phase or with the final implant restoration.
During the surgical treatment phase, the teeth were extracted with the least amount of trauma to the soft tissue, especially to the papillae and gingival margins.
The sockets were thoroughly curetted and irrigated prior initiating the osteotomy, especially focusing on the sockets with existing periapical lesions. The placement of implants into sockets with periapical or periodontal infections can be done successfully with good curettage (Chrcanovic 2015).
Both sites were prepared into the solid palatal wall of the socket and the osteotomies were under prepared to achieve a minimum high insertion torque of at least 30N to be considered for non-functional immediately loaded temporization. 4.0x16mm implants were placed with an insertion torque above 50N at both sites. The jump gaps were grafted with cortical-cancellous allograft (Life-Net Salvin) in a dual zone fashion. The most coronal zone was packed with a moderate force to create more volume in the soft tissue compartment.

During placement, temporary shells can be used as surgical guides to confirm the appropriate implant positioning prior to the implant going to the final depth of the osteotomy. If the angulation is not ideal, some modification can be made, While still being able to maintain a high insertion torque.
The implant must be planned and executed with a high precision as regards the position, angulation and depth in order to utilize the lab made custom temporary shells successfully.
The preferred depth of implant placement should be at least 3-4mm apical to the proposed facial gingival zenith (Linkevicius). An appropriate implant placement depth is crucial to provide adequate running room for the temporary and final restorations, a concave emergence with an adequate jump gap with the appropriate “regenerative space” (Gonzalez-martin) during dual zone grafting (Tarnow). In thin tissue phenotypes or in cases with pre-existing recession, soft tissue augmentation utilizing a connective tissue graft can be done at this time. Due to a favorable phenotype and the absence of any soft tissue defect, this case didn’t need a soft tissue graft.
Upon insertion of the temporary abutments, a radiograph should be taken to confirm adequate seating, if the seating of the abutments is not passive, confirm that the surface of the abutment is not impinging on the socket walls. Profiling the bone may be needed in some cases to prevent the formation of a bony defect due to the proximity of the restorative abutment to the bony walls of the socket.

Prior to the pick up, liquid Opaquer (kerr) can be used to mask the metal hue of the temporary abutments if not using PEEK abutments.


Once both temporary abutments were passively seated, the temporary shells were adjusted to be seated over the abutments freely. Sometimes some adjustment can be needed to increase the diameter of the abutment hole.
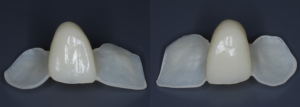
The custom shells were picked up using a self-cure composite based temporary material (Integrity), the wings can be removed at this stage and the “sub- critical zone” of the emergence profile was customized chairside by hand using a flowable composite and football diamond bur
The screw retained temporary restorations were hand tightened to about 15N and sealed with Teflon tape and Fermit™ Temporary Filling Material.
There should be no centric or protrusive occlusal contact. If the adjacent teeth are periodontally compromised, I also prefer to have very light proximal contacts to avoid any micro movement from the adjacent teeth during normal mastication
The 6 weeks follow up showed stable soft tissue, no signs of inflammation, and good maintenance by the patient. The implants showed no mobility and appeared to be integrating uneventfully.
Case 2
Delayed Implant Bridge Temporization After Implant Placement
Not all clinical situations present us with ideal immediacy outcomes and staging may be the only option. The following case presented with initial plan extract teeth and immediately place implants with immediate fixed temporary. Due to lower stability at implant #7, we decided to avoid temporalization until at least 2 mo post implant placement.
Immediate implants were placed and patient was given an Essix retainer to wear for at least 6 weeks post implant placement.
Since temp shells were already fabricated, we were ready to pick up our temporary prosthesis using non-engaging temporary abutments.
When picking up a multiple unit bridge on temporary abutments, make sure to never use flowable due to possible shrinkage of the material and only use self-curing no-shrinkage resin based material (Integrity).
Once the temporary is picked up and emergence profile is customized to have an adequate regenerative space and properly placed Critical contour (0.5 short of the final gingival margin) we are ready to deliver the prosthesis.
Prior to delivery make sure to leave a good amount of room in the embrasures to allow for soft tissue fill during the training period.
Upon delivery of the prosthesis, some blanching is a good sine of tissue compression in needed areas (usually proximally) which starts the process of tissue training.
After 3 months of tissue training, patient returned for his final evaluation prior to final restoration.
Pt was ready to proceed with the final restorations and was referred back to his restoring doctor for his final bridge.
Final Thoughts
With further advanced in digital workflow of Implantology, allows us to provide much faster, more predictable and highly esthetic results from immediate single tooth replacement to a full arch reconstruction. Implantology of the esthetic zone demands seamless transition between tooth to an implant supported restorations with superior preservation or augmentation of hard and soft tissues. Besides a proper 3-dimentional placement of the implant, soft tissue management is a key component and implant temporization is a important category of soft tissue management. Digitally designed implant provisional shells with utilization of indexing wings is an efficient tool used for immediate preservation or redevelopment of the soft tissue emergence profile in immediate or delayed implant protocols.

Contact
Dr. Dmitriy Ivanov, DDS
Board Certified Periodontist and Implant Specialist
Address: 16055 Ventura Blvd. Suite 405 Encino, CA 91436
Email: Dmitriyivanov.dds@gmail.com
Instagram: perioimplant_LA
Web: www.perioamigos.com